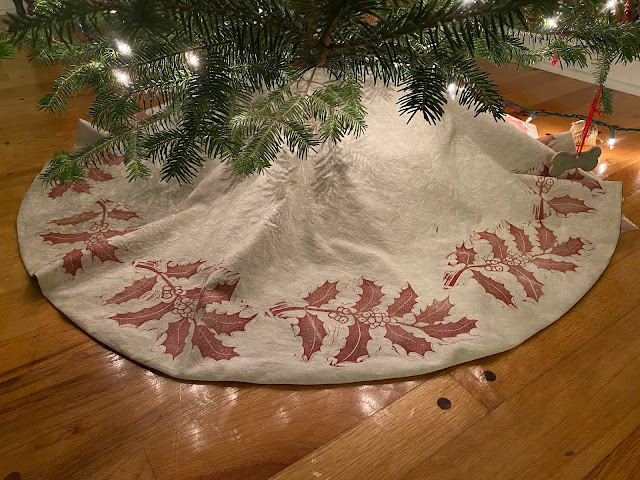
Last year, or maybe the year before, I decided I wanted to make my own tree skirt--a block printed one with a linoleum block of my own design. I even bought fabric last year! But I never got around to it. I think I used a tablecloth wrapped around the tree for a skirt instead. It's a lot of work, coming up with a design, carving, and printing it on fabric (not the easiest thing to do, and I still think my method needs improvement for better results), and then the cutting and sewing! It's a lot. So understandably I put it off. And part of that was not knowing how I was going to do certain parts. It was intimidating. But sometime recently I decided I was just going to do it. It couldn't be THAT hard. Come on!
I knew I wanted to do a plant design, what which plant? What color? Mistletoe? Pine? Snowdrops (I don't know why, snowdrops are not a Christmas flower)? Can't do holly, that's so cliché! My mom's name is Holly, too. It's too obvious. But actually holly is perfect, so holly it is.
 |
| The finished tree skirt! |
 |
| The block |
 |
| The print on paper |
 |
| Printing on the dining room table. The fabric is yarn-dyed Essex Linen in oyster (a linen-cotton blend). |
To print on fabric, I use what I've learned from Jen Hewett's
Print, Pattern, Sew*. She uses screen printing ink applied to the block with a mini paint roller. I mixed this dark red with Speedball screen printing ink (it's very similar to the red that I mixed for a red currant design I printed a few years ago). I don't feel qualified to explain this, but I do recommend checking out Jen Hewett's book and other tutorials and try things out for yourself. I purchased some Speedball ink for block printing on fabric and I'd like to see if I like it better, but I only have black so I didn't try it for this project. As much as I did say it's hard and there are a lot of steps, block printing on fabric is not so far out there that it's out of reach. There's a bit of investment to get the initial supplies, but it's not terrrribly expensive, so I say go for it!
As this is screen printing ink, I followed the instructions for heat setting it (let it dry, set with iron) before sewing.
I won't go into details about how much struggled with just how to get this assembled, but suffice it to say, I did not use any batting (or interfacing--I'm plastic-phobic so I will avoid polyester/adhesive interfacing unless I'm out of options). It ended up being two pieces of fabric sewn together, ties made from the red fabric, and binding at the top (middle?). I could have cut out a wedge to make the edges lie flat, since the base of the tree is more of a cone than a flat circle, but I did not. I don't think I mind that it sort of ruffles at the edge. I'm living with it for now. And I'll be real, I don't like redoing stuff, so it's probably not going to change.
 |
| Our majestic tree from a local tree farm. The strohsterne star topper is new, too, ordered online from a Scandinavian store in Minnesota. |
 |
| I can make the ties lie neatly if I tried. You can see a tiny bit of the binding at the very top of this photo. |
So that is a project conceived well over a year ago finally done! And with plenty of time to enjoy it before Christmas.
It's also reversible! This pretty print is by Sevenberry, a fabric brand from Japan.
Before having a toddler, my ornaments were largely vintage glass. For the last few years, I've gone a different direction. Not breakable, but not plastic (remember, I am phobic). I separated out all the wooden, cloth, metal, and other ornaments from the glass and used just those. I added strohsterne stars from my local Buy Nothing group, and dried orange slices and other natural material or handmade things. What I noticed from what I had initially was a red/natural (brown, straw)/metallic color scheme and I've really embraced that. Last year, I got really into making felt ornaments, so I now have those additions, too. Below are some of the ornaments that I've made.
 |
| J for Jonathan |
 |
| Saint Hildegard of Bingen--my treasure, made last month. An icon in felt. |
 |
| Strohsterne star and the felt poinsettia I made earlier. P.S. I recently learned that the native name (Nahuatl language) for this plant is cuetlaxochitl, pronounced ket-la-sho-she, and I'm trying to remember/learn that. |
 |
| Another recent project. Real walnut shells with secret notes hidden inside and painted gold and silver. Inspired by a Victorian tradition. |
 |
| Dala horse I made last year. |
 |
| Mushroom I made last year. |
 |
| My favorite mushroom that I made last year. |
 |
| An embroidered Santa, made at a party hosted by my friend Katie. The project that kick-started my embroidery interest. |
 |
| Silver walnut |
Thanks for looking! I really enjoy making things with textiles, thread, and natural materials. It's so satisfying and grounding. I hope you have your own projects and decorations you adore, however or whatever you celebrate!
*Disclosure: I am an affiliate of Bookshop.org and I will earn a commission if you click through and make a purchase.


Comments
Post a Comment